How to Create & Use VMC (SWIFT) Models
Introduction
When compared to encryption, VMC models are a better way to distribute simulation models of your IP. This article talks about what a VMC model is, how to generate and distribute it, and if you received one of these models then how to use it in your testbench
All code presented here can be downloaded from GitHub
Say you're an IP vendor. Your customers will typically ask you for a simulation model, to which they can hook up their testbenches, to simulate and test their design.
There are a few ways to securely distribute this model. One that immediately comes to mind is encryption. Encrypting an RTL design is an easy process but anyone who's used an encrypted IP knows that it has a few limitations -
- The IP encryption is simulator specific. If your customer uses VCS then the IP has to be encrypted using VCS, if another customer uses Questasim then a different version of the IP which is encrypted with Questasim needs to be provided.
- Also, encryption typically works on a per-file basis. So you can either provide a directory full of individually encrypted design files or the design has to be flattened with something like the
-mangleVCS flag to convert it to a single file before encrypting.
So is there a better alternative?... Enter VMC model (Sometimes also referred to as SWIFT model).
What is a VMC Model?
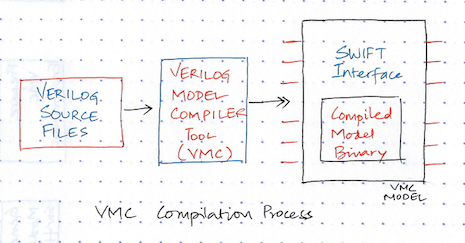
VMC model is a much better way to safely distribute a simulation model of your IP. It is essentially a compiled binary of your RTL design generated by a tool called Synopsys Verilog Model Compiler (VMC).
Since the output is a binary object (machine opcodes and addresses) a VMC model is extremely secure because it is impossible to recover the original Verilog source from the object file.
Alright, now we sort of know what a VMC model is. But if you convert your RTL into an object file how do you instantiate the IP and hook it up to your testbench? This is where SWIFT comes in. SWIFT is basically the interface which lets you instantiate and communicate with the VMC model binary object.
VMC models have several big advantages over simple encrypted models:
- It works across simulators (VCS, Cadence, Mentor all of them support this)
- It is as secure as encryption. RTL cannot be recovered from the VMC model.
- Tons of functionality - You can expose certain parts of your design (like a register block) by using something called "windows". You can embed SDF timing information into the compiled model and even use back annotation.
How to Create a VMC Model
For the purpose of demonstration, let's say we have this 3 module toy design which we have to package and distribute to a few customers. Our toy project's directory structure looks like this
vmc-swift
├── design
│   ├── Makefile
│   ├── design.f
│   ├── flist.f         <- filelist for sim with rtl
│   ├── swift_test.f    <- filelist for sim with vmc model
│   ├── operator.sv     <- design top
│   ├── registers.sv    <- reg module
│   ├── calculate.sv    <- design module
│   ├── tb_top.sv       <- tb top used with actual RTL
│   └── tb_top_swift.sv <- tb top used with vmc model
└── model      <- directory where vmc model will be created
    ├── data
    └── foundry
You can download the files from here
Here's a high-level flow of the VMC model creation process
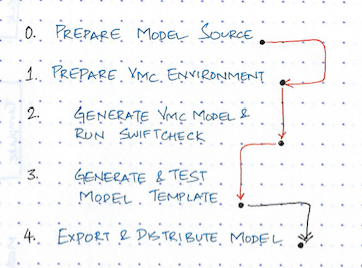
Step 0: Prepare model source
Compile the design, simulate, run a bunch of tests and make sure everything is good.
vmc-swift% cd design
design% make test
Step 1: Setup VMC enviroment
Now that your design is clean, we need to setup the required environment variables to run the VMC tool.
# You probably already have this set as it is required for step 0.
setenv VCS_HOME /home/svio/tools/synopsys/vcsmx/vcs-mx_vK-2015.09-SP2/
# Path to where the VMC tool is installed
setenv LMC_HOME /home/svio/tools/synopsys/vmc/vmc_vK-2015.09-SP2/VMC_INSTALL
# By default the VMC tool generates and dumps the compiled model into
# the LMC_HOME directory. If LMC_FOUNDRY_HOME is set then it uses
# that as the destination to generate the model.
setenv LMC_FOUNDRY_HOME /home/svio/sandbox/vmc-swift/model

setenv LMC_PATH $LMC_FOUNDRY_HOME/foundry
# Set LMC_CONFIG to a valid .lmc configuration file. If you have multiple
#versions of the same model installed then this has to be set the desired model.
setenv LMC_CONFIG $LMC_FOUNDRY_HOME/data/amd64.lmc
# So that vmc and other tools can be found in the PATH
setenv PATH ${VCS_HOME}/bin:${LMC_HOME}/bin:${PATH}
Step 2a: Generate model
To create the model
% cd design
# then run
% vmc -full64 -sverilog -model operator_ip -f design.f -vendor SVIO -version 1.1
That's it! You now have a VMC model of your IP. Your screen dump should end with something like this:
ld -r -o operator_ip.tmp.o tmp1.o /home/svio/tools/synopsys/vmc/vmc_vK-2015.09-SP2/
VMC_INSTALL/vmc/linux64/lib/swiftstub.o
rm -f tmp1.o
mv operator_ip.tmp.o ./operator_ip.o
g++ -w  -pipe -O -I/home/svio/tools/synopsys/vmc/vmc_vK-2015.09-SP2/VMC_INSTALL/
vmc/include   -fPIC -w  -w  -s -Xlinker -Bsymbolic  -shared -ldl -lm  -lc
-lpthread -ldl ./operator_ip.o   -o ./modelobj.so
rm -f operator_ip.o
./operator_ip.o up to date
Note
Say, you make a mistake in your VMC run command. For example you forgot to specify the -full64 option. Then your VMC run will fail and when you re-run vmc you'll get an error like this
% vmc-swift% vmc -model operator_ip -f design/design.f -vendor SVIO
ERROR running vmc: The work directory csrc.vmc already exists.You'll need to delete vmc.csrc to continue.
Step 2b: Run swiftcheck
swiftcheck is a script that's available in $LMC_HOME/bin. It checks if the model is correctly installed in the $LMC_HOME/foundry directory.
The output should look something like this ... with 0 errors.
model% swiftcheck operator_ip
Executing: /home/svio/tools/synopsys/vmc/vmc_vK-2015.09-SP2/VMC_INSTALL/lib/amd64.lib/swiftcheck10040 operator_ip

SwiftCheck Note:  LMC_HOME               "/home/svio/tools/synopsys/vmc/vmc_vK-2015.09-SP2/VMC_INSTALL"
SwiftCheck Note:  LMC_PATH               "/home/svio/sandbox/vmc-swift/model/foundry"
SwiftCheck Note:  LMC_COMMAND
SwiftCheck Note:  LMC_CONFIG             "/home/svio/sandbox/vmc-swift/model/data/amd64.lmc"
SwiftCheck Note:  DW_LICENSE_OVERRIDE
SwiftCheck Note:  DW_WAIT_LICENSE
SwiftCheck Note:  LMC_USE_32BIT

SwiftCheck Note: Running library for Platform type: amd64 (64bit)
SwiftCheck Error Summary
swiftcheck v2.0 : 0 Error(s).
Step 3: Generate template and test VMC model
Alright, now that we've generated the VMC model, it is time to eat our own dog food. We need to make sure this model is good.
If you parse through $LMC_FOUNDRY_HOME directory you'll see a bunch of .so, .dat, .db files. But what you really need is a top-level model.v which you can instantiate in your testbench. This top-level model.v is called a template.
Remember, the VMC model is just a binary and that's why you don't see any .v file in the vmc-swift/model directory. You have to generate this template file manually. If you use Synopsys VCS you can generate the top-level DUT with a vcs command. But before we do any of this we need to add one more environment variable. This is so that some essential .so files are brought into the LD_LIBRARY_PATH.
setenv LD_LIBRARY_PATH ${LMC_HOME}/lib/amd64.lib/:${LD_LIBRARY_PATH}
% cd design
% vcs -sverilog -full64 -lmc-swift-template operator_ip
This generates operator_ip.swift.sv which is a verilog file generated from the VMC SWIFT model that you just created. Open this file and inspect it.
If you use another simulator then you can use the wrap_gen tool to generate the top-level file:
vmc-swift% cd design
# Generate template for VCS using wrap_gen
design% $LMC_HOME/bin/wrap_gen -module operator_ip -sim VCS -name operator_ip_vcs.v
# Generate template for Mentor Graphics Questasim
design% $LMC_HOME/bin/wrap_gen -module operator_ip -sim MTI_Verilog -name operator_ip_mti_verilog.v
Now create tb_top_swift.sv and replace the duv with OPERATOR_IP. Also create a filelist swift_test.f. Run the same test as before to ensure that the test output from using the VMC model is the same as the original RTL. Open up tb_top_swift.sv and swift_test.f in the design directory and inspect them.
% vcs -sverilog -full64 -l sim_swift.log -lmc-swift -f swift_test.f +vcs+vcdpluson
You should see the test pass the same way as before. At this point you've generated a model and verified that it works exactly similar to the actual RTL. The next step is to export to model so that it can packaged and distributed.
Exporting the Model
Step 5: Export & distribute
We've now generated a model in the LMC_FOUNDRY_HOME/foundry directory and validated it. Next step is to create a fully contained install package for your customer by exporting from your development directory all the files and models your customers will need.
To do the export you have to use the sl_admin tool which is present in the LMC_HOME/bin path. The syntax for the command is:
sl_admin -export -o <image_path> -vendor <vendor_name> {-f model_file} | {model1 [model2 ... modeln]} [-title "product_title_string"]
Lets use operator_ip_swift_model as the output directory for the install package. operator_ip is the name we gave our model while creating it.
cd vmc-swift
sl_admin -export -o operator_ip_swift_model operator_ip
This will create the directory operator_ip_swift_model
Installing a VMC Model
Note
If you are continuing this tutorial from the previous step, open up a new terminal before you proceed. You'll need a new shell with none of the above environment variables set.
Now assume you've been given a VMC model. You will typically receive a zip file, something like operator_ip_swift_model.tgz. Let's say you've extracted the above zip file into sandbox/swift-model-install/operator_ip_swift_model. Create the following directory for installation sandbox/swift-model-install/OPERATOR_IP_INSTALL and set is as LMC_HOME.
# Set LMC_HOME as the path where you're going to install the model
cd swift-model-install/OPERATOR_IP_INSTALL
setenv LMC_HOME `pwd`
To install the model, go into the path where you extracted the package. You'll find a script called sl_admin.csh. Launch it, this will bring up a GUI.
# Launch sl_admin GUI to install the model
cd ../operator_ip_swift_model
./sl_admin.csh
Next you have to generate Top level Model wrapper. This is the essential model.v that you can instantiate in your testbench. For reference: Look at vmc.pdf -> ch9 Tool and Data Set Reference -> Universal Wrapper generator.
# This path has some essential .so files
setenv LD_LIBRARY_PATH $LMC_HOME/lib/amd64.lib/
OPERATOR_IP_INSTALL% $LMC_HOME/bin/wrap_gen -module operator_ip -sim VCS -name operator_ip_vcs.v
 module(s) name:  operator_ip
 path:            ./model_src
 wrapper name:    operator_ip_vcs.v
 configuration:
 simulator:       vcs
 platform:        amd64
Exiting wrap_gen successfully.

OPERATOR_IP_INSTALL% $LMC_HOME/bin/wrap_gen -module operator_ip -sim MTI_Verilog -name operator_ip_mti_verilog.v
 module(s) name:  operator_ip
 path:            ./model_src
 wrapper name:    operator_ip_mti_verilog.v
 configuration:
 simulator:       mti_verilog
 platform:        amd64
Exiting wrap_gen successfully.
To test the model we just installed, create the directory sandbox/swift-model-install/test_model. Download tb_top.sv from the provided vmc-swift/test_model github directory. This tb_top.sv instantiates the operator_ip model.
# compile and run
# Since $LMC_HOME is set to the path where the model is installed
# vcs and other simulators can find the required files
test_model% vcs -sverilog -full64 tb_top.sv -lmc-swift $LMC_HOME/model_src/operator_ip_vcs.v
./simv
To run the same model with Mentor Questasim
test_model% vlog tb_top.sv $LMC_HOME/model_src/operator_ip_mti_verilog.v +incdir+$LMC_HOME/sim/pli/src
test_model% vsim -c tb_top -pli $LMC_HOME/lib/amd64.lib/swiftpli_mti.so -do "run -all"
Extra Credit
If you open up the files generated by wrap_gen for Mentor and VCS, one big difference you'll note is that the model is invoked using $vcs_swift in one and $lm_swift in the other.
The Mentor wrapper using something called Synopsys Logic Models To Verilog (LMTV) application. This is a PLI interface which lets verilog talk to the VMC model. The LMTV is delivered in the form of a swiftpli shared library. This is the -pli $LMC_HOME/lib/amd64.lib/swiftpli_mti.so switch you include when using the model with the Mentor simulator.
You can read all about LMTV and the SWIFT interface in the Synopsys Simulator Configuration Guide for Synopsys Models. You'll find this document in sandbox/swift-model-install/ OPERATOR_IP_INSTALL/doc/ smartmodel/manuals.
Closing Thoughts
If you're a company that sells IPs or a vendor (like Broadcom or Marvell) who sells ASICs (such as switch chips, TCAMs, Memory, etc), then the simulation model is as important as the design IP/ASIC. The simulation model is used by your customer to ensure successful inter-operability with your design. In other words, a quality simulation model is necessary to ensure your customer's and your own success.
References
This article is a primer. If you're new to generating or consuming a VMC model, then consider checking out the following 2 documents. These are very useful and you'll find them in the docs directory when you install the Synopsys VMC tool.
vmc.pdfvmc_tutorial.pdf
Also check out the docs under the following path. This is where you installed the above example model
sandbox/swift-model-install/OPERATOR_IP_INSTALL/doc/smartmodel/manuals
If you see some performance issues with the Cadence simulator, you may find this useful http://www.deepchip.com/items/0379-10.html
If you found this content useful then please consider supporting this site! 🫶
