SystemVerilog Generate Construct
Overview
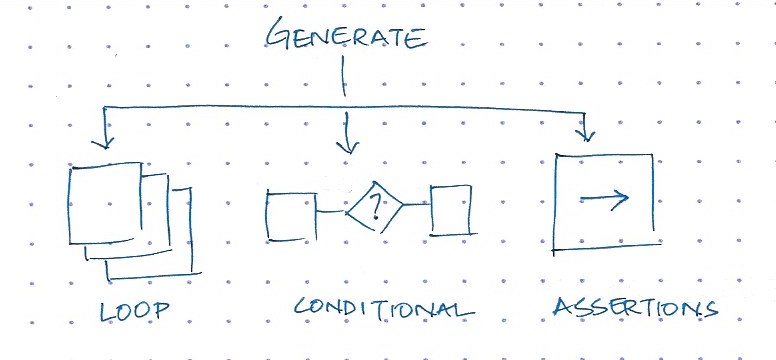
The Generate construct is a very useful tool. You'll commonly see it used for these 3 purposes
- Lazy instantiation of module items using a for-loop
- Changing the structure or design of a module using SystemVerilog Parameters
- Using generate with assertions for Functional and Formal Verification
Before we begin, there's one important thing to understand about the generate construct. Generate blocks are evaluated during elaboration time and the result is determined before the simulation begins. In other words generate statements are NOT a run-time construct. If you think about it for a second, the generate construct is actually creating a circuit and we cannot add or remove hardware circuits on-the-fly, so it does make sense that a generate block is evaluated during elaboration.
Loop Generate Construct
The loop generate construct provides an easy and concise method to create multiple instances of module items such as module instances, assign statements, assertions, interface instances and so on. Think of it as a cloning machine.
In essence it is a special type of for loop with the loop index variable of datatype genvar. Here's an interesting fact about genvar - it is an integer datatype that exists only during elaboration time and disappears at simulation time.
/** Example 1 */
/**
* 16 input mux
*
* Example of how to use Loop Generate Construct
*/
module mux_16(
    input  logic [0:15] [127:0] mux_in,
    input  logic [3:0] select,
    output logic [127:0] mux_out
);

    logic [0:15] [127:0] temp;

    // The for-loop creates 16 assign statements
    genvar i;
    generate
        for (i=0; i < 16; i++) begin
            assign temp[i] = (select == i) ? mux_in[i] : 0;
        end
    endgenerate

    assign mux_out = temp[0] | temp[1] | temp[2] | temp[3] |
                    temp[4] | temp[5] | temp[6] | temp[7] |
                    temp[8] | temp[9] | temp[10] | temp[11] |
                    temp[12] | temp[13] | temp[14] | temp[15];
endmodule: mux_16
... and as you would expect, you can nest generate for-loops. Just make sure you use separate genvars for the outer and inner loop and take care while referencing these vars in your nested for-loop. This is a common place where mistakes are made.
Conditional Generate Construct
The conditional generate construct lets you alter the structure of your design based on Parameter values passed during module instantiation. This is tremendously useful while creating parameterized common RTL blocks for your design.
A simple example -
/** Example 2.1 */
/**
* A simple generate example. This paramerter OPERATION_TYPE,
* passed when this module is instantiated, is used to select
* the operation between inputs `a` and `b`.
*/
module conditional_generate
    #(parameter OPERATION_TYPE = 0)
    (
        input  logic [31:0] a,
        input  logic [31:0] b,
        output logic [63:0] z
    );

    // The generate-endgenerate keywords are optional.
    // It is the act of doing a conditional operation
    // on a parameter that makes this a generate block.
    generate
        if (OPERATION_TYPE == 0) begin
            assign z = a + b;
        end
        else if (OPERATION_TYPE == 1) begin
            assign z = a - b;
        end
        else if (OPERATION_TYPE == 2) begin
            assign z = (a << 1) + b; // 2a+b
        end
        else begin
            assign z = b - a;
        end
    endgenerate
endmodule: conditional_generate
Another example - You've been given the task of creating a common CRC generator block. Other designers in the team should be able to choose between 1 of 3 polynomials for the CRC calculation.
Here is one way to do it - you provide a parameter called CRC_SEL, which is set when this module is instantiated, and this CRC_SEL param selects which CRC function is generated within the module. By using a generate block instead of a simple mux, you save a bunch of gates and flops because the CRC functions that are not required are never instantiated.
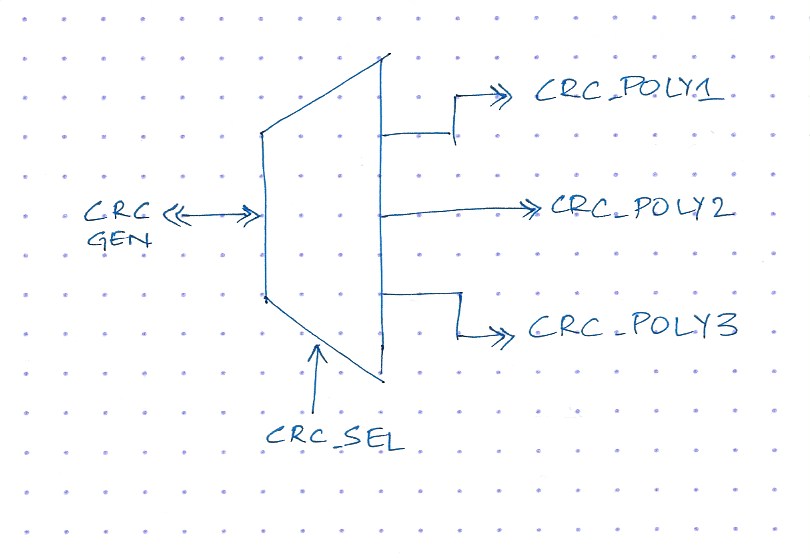
The code is explained within comments. An important thing to notice is how the function is called using crc_poly.CRC16_D8(). Read more about it in the code comments.
Certain parts of the code have been omitted to keep the snippet short.
/** Example 2.2 */
/**
 * CRC generator module. Select the desired polynomial
 * using the CRC_SEL parameter.
 *
 * Default polynomial : x^16 + x^15 + x^2 + 1
 * CRC_SEL = 0        : x^16 + x^1 + 1
 * CRC_SEL = 1        : x^16 + x^12 + x^5 + 1
 *
 * USAGE:
 * + Strobe `start` when driving the first valid byte
 * + Strobe `done` one clk after driving the last valid byte
 * + The final CRC is available 1 clk after the last valid byte
 *   is driven. This is the same cycle you'll drive `done`.
 *
 * The CRC functions were generated using this online tool
 * http://www.easics.com/services/freesics/crctool.html
 */
module crc_gen
    #(parameter CRC_SEL = 0)
    (
        input  logic clk,
        input  logic rst,
        input  logic start,
        input  logic done,
        input  logic [7:0] data_in,
        input  logic [15:0] crc_in,
        output logic [15:0] crc_out
    );

    logic [7:0]  data_in_d;
    logic [15:0] crc_in_d;

    assign crc_in_d = (start | done) ? 16'd0 : crc_in;
    assign data_in_d = (done) ? 8'd0 : data_in;
    always_ff @(posedge clk) begin
        if (rst) begin
            crc_out <= 'd0;
        end
        else begin
            // Generate blocks are always assigned a name. If
            // you don't name the generate block, it will be
            // given a default auto generated name.
            //
            // To invoke a function within a generate block,
            // hierarchically call it
            // <generate_blk_name>.<function_name>
            crc_out <= crc_poly.nextCRC16_D8(data_in_d, crc_in_d);
        end
    end

    // Once again the generate-endgenerate keywords are optional
    // It is the act of using a parameter, CRC_SEL, in the case
    // statement that makes it a generate block
    //
    // Also notice how all the generate blocks are given the same
    // name `crc_poly` and all the function names are the same
    // `nextCRC16_D8`. This is correct because only one of the
    // function declarations is compiled in during elaboration
    // phase.
    generate
    case (CRC_SEL)
        0:
        begin: crc_poly
            // polynomial: x^16 + x^1 + 1
            // data width: 8
            // convention: the first serial bit is D[7]
            function automatic [15:0] nextCRC16_D8;

                input [7:0] Data;
                input [15:0] crc;
                reg [7:0] d;
                reg [15:0] c;
                reg [15:0] newcrc;

                d = Data;
                c = crc;

                newcrc[0] = d[0] ^ c[8];
                newcrc[1] = d[1] ^ d[0] ^ c[8] ^ c[9];
                ...
                newcrc[14] = c[6];
                newcrc[15] = c[7];
                nextCRC16_D8 = newcrc;
            endfunction
        end
        1:
        begin: crc_poly
            // polynomial: x^16 + x^12 + x^5 + 1
            // data width: 8
            // convention: the first serial bit is D[7]
            function automatic [15:0] nextCRC16_D8;

                input [7:0] Data;
                input [15:0] crc;
                reg [7:0] d;
                reg [15:0] c;
                reg [15:0] newcrc;

                d = Data;
                c = crc;

                newcrc[0] = d[4] ^ d[0] ^ c[8] ^ c[12];
                newcrc[1] = d[5] ^ d[1] ^ c[9] ^ c[13];
                ...
                newcrc[14] = d[6] ^ d[2] ^ c[6] ^ c[10] ^ c[14];
                newcrc[15] = d[7] ^ d[3] ^ c[7] ^ c[11] ^ c[15];
                nextCRC16_D8 = newcrc;
            endfunction
        end
        default:
            begin: crc_poly
            // polynomial: x^16 + x^15 + x^2 + 1
            // data width: 8
            // convention: the first serial bit is D[7]
            function automatic [15:0] nextCRC16_D8;

                input [7:0] Data;
                input [15:0] crc;
                reg [7:0] d;
                reg [15:0] c;
                reg [15:0] newcrc;

                d = Data;
                c = crc;

                newcrc[0] = d[7] ^ d[6] ^ d[5] ^ d[4] ^ d[3] ^ d[2] ^ d[1] ^ d[0] ^ c[8] ^ c[9] ^ c[10] ^ c[11] ^ c[12] ^ c[13] ^ c[14] ^ c[15];
                newcrc[1] = d[7] ^ d[6] ^ d[5] ^ d[4] ^ d[3] ^ d[2] ^ d[1] ^ c[9] ^ c[10] ^ c[11] ^ c[12] ^ c[13] ^ c[14] ^ c[15];
                ...
                newcrc[14] = c[6];
                newcrc[15] = d[7] ^ d[6] ^ d[5] ^ d[4] ^ d[3] ^ d[2] ^ d[1] ^ d[0] ^ c[7] ^ c[8] ^ c[9] ^ c[10] ^ c[11] ^ c[12] ^ c[13] ^ c[14] ^ c[15];
                nextCRC16_D8 = newcrc;
            endfunction
        end
    endcase
    endgenerate
endmodule: crc_gen
scroll to see more code
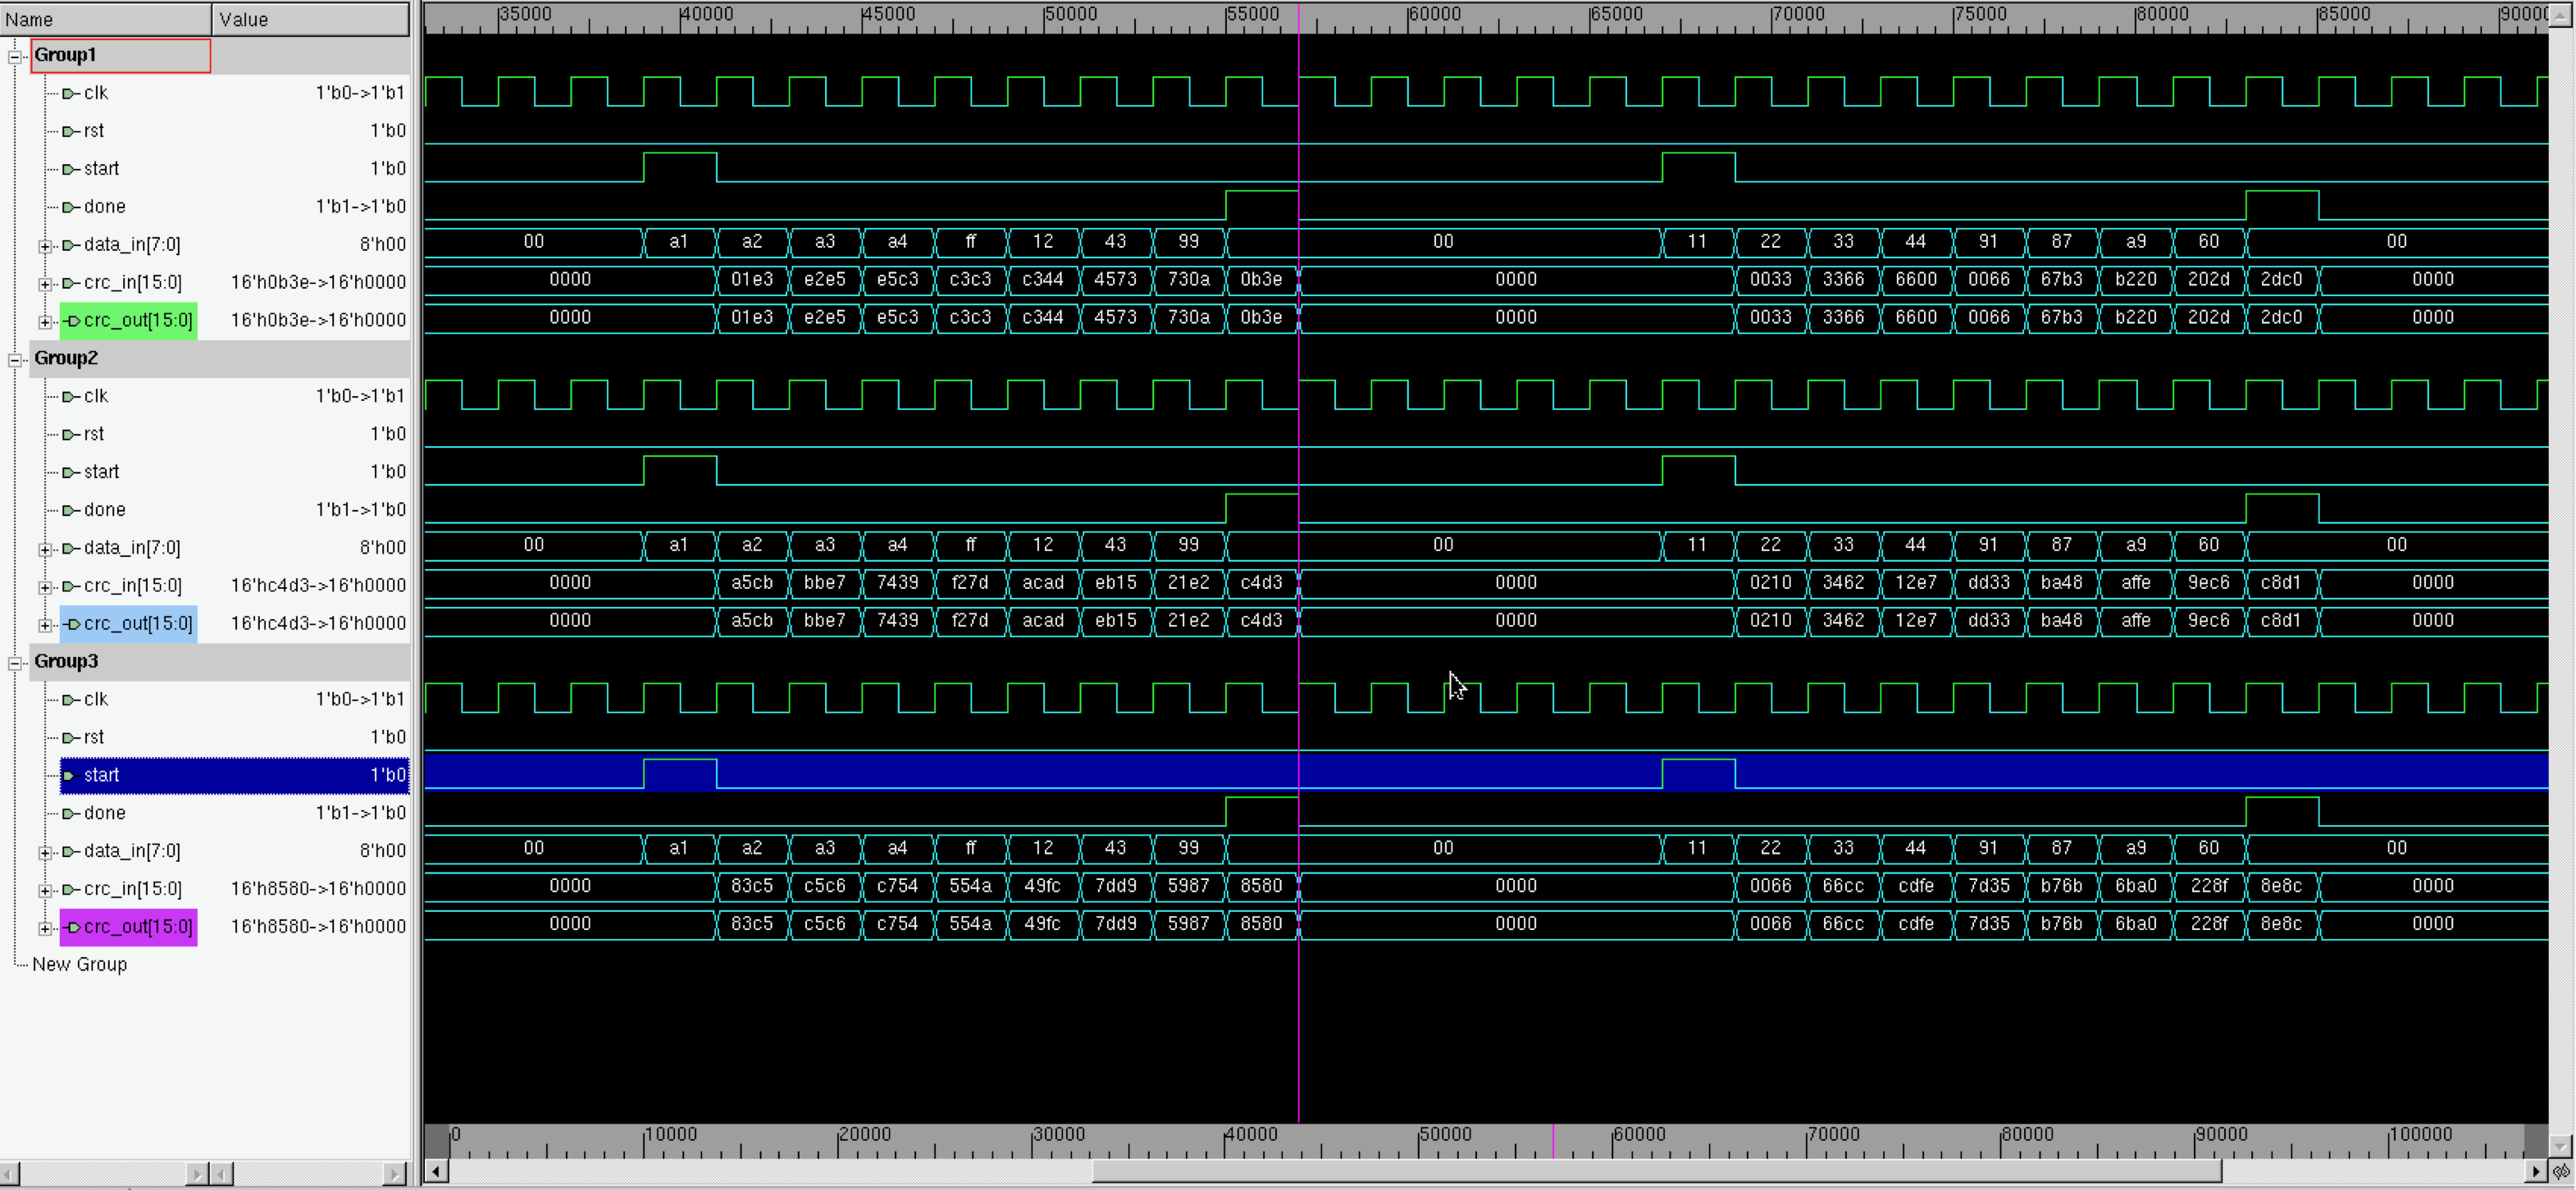
For completion, follow the github link and also take a look at the testbench code for the above crc_gen module, you may find it useful. Here are some waves from the testbench stimulus.
Assertions and Formal Verification
The generate construct is also very useful while writing assertions and this in-turn helps with Formal Verification.
If you have any experience with Formal Verification, then you'll know that Formal tools very quickly run into computational bounds while trying to prove properties. So, it is important to keep your properties short and simple.
For example, if you have an arbiter block with 8 REQquest inputs and 8 ACK outputs, then instead of writing a single assertion to cover all 8 REQ/ACK pairs, it is better to break it down into 8 individual assertions with 1 REQ/ACK pair per assertion.
/** Example 3.1 */
genvar k;
generate
    for (k=0; k < 8; k++) begin
        req_a: assert property (req[k] |=> ack[k]);
    end
endgenerate
Here's another example, this is a little more exciting.
Let's say you have a Client - Server system and you have to do Formal Verification on the RTL model of the Client and that of the Server individually. The assertions on the outputs of the Client become assumptions on the input of the Server, and vice-versa. So, instead of writing separate assertions for each of them, this is how you could build your Formal TB.
- Write a common module with all the properties. Define a parameter to tell this "properties module" if the
CLIENT_IS_DUTor ifSERVER_IS_DUT. - Bind the properties module to the Client or Server and pass the appropriate Parameter when doing the bind
- Use a recipe of Generate and the Macro constructs to define your properties as
assertorassume.
Like this -
/** Example 3.2 */
/**
* Properties module
*/
module client_server_properties (/*IOs go here*/);
    parameter CLIENT_IS_DUT = 1;
    parameter SERVER_IS_DUT = 0;

    `define CLIENT_ASSERT (name, prop, msg) \
        generate if (CLIENT_IS_DUT) begin \
            name: assert property (prop) else $error (msg); \
        end else begin \
            name: assume property (prop) else $error (msg); \
        end \
        endgenerate

    `define SERVER_ASSERT (name, prop, msg) \
        generate if (SERVER_IS_DUT) begin \
            name: assert property (prop) else $error (msg); \
        end else begin \
            name: assume property (prop) else $error (msg); \
        end \
        endgenerate

    // Properties
    property client_ack;
        @(posedge clk) disable iff (reset)
        (req |=> ack);
    endproperty
    `CLIENT_ASSERT(client_ack_A, client_ack, "No ACK received");

endmodule

/**
* Binding to Client DUT
* Make sure you set the appropriate param while creating the bind
*/
bind client_rtl client_server_properties #(.CLIENT_IS_DUT(1), .SERVER_IS_DUT(0)) prop_inst
(.*);
Note
The above example was adapted from the book Formal Verification, Erik Seligman, et al., Chapter 7: Page 194
Hierarchically Accessing Generated Blocks
One thing that trips up people is how to access a module item that are located within a generate block.
A generate block is always given a name. If you don't name it, the compiler will automatically assign a generic name such as genblk01, genblk02 and you will typically have to dump waves and look at your Visualizer tool to see what names were assigned.
To access a module item within a generate block, you have to hierarchically access it using <generate_blk_name>.<module_item_name>. This is why in example 2.2 we invoked the CRC polynomial function by calling crc_poly.CRC16_D8() (i.e., <generate_blk_name>.<function_name>).
Here's a nice example from the SystemVerilog LRM 1800-2012 (example 4 section 27.5). Look at how you access the task and module instance defined within the case-generate block.
The hierarchical instance names are:
memory.word16[3].p, memory.word16[2].p,
memory.word16[1].p, memory.word16[0].p,
and the task
memory.read_mem
/** Example 4 */
module dimm(addr, ba, rasx, casx, csx, wex, cke, clk, dqm, data, dev_id);
parameter [31:0] MEM_WIDTH = 16, MEM_SIZE = 8;
...
genvar i;
case ({MEM_SIZE, MEM_WIDTH})
{32'd8, 32'd16}: // 8Meg x 16 bits wide
begin: memory
for (i=0; i<4; i=i+1) begin:word16
sms_08b216t0 p(.clk(clk), .csb(csx), .cke(cke),.ba(ba),
.addr(addr), .rasb(rasx), .casb(casx),
.web(wex), .udqm(dqm[2*i+1]), .ldqm(dqm[2*i]),
.dqi(data[15+16*i:16*i]), .dev_id(dev_id));
// The hierarchical instance names are:
// memory.word16[3].p, memory.word16[2].p,
// memory.word16[1].p, memory.word16[0].p,
// and the task memory.read_mem
end
task read_mem;
input [31:0] address;
output [63:0] data;
begin // call read_mem in sms module
word[3].p.read_mem(address, data[63:48]);
word[2].p.read_mem(address, data[47:32]);
word[1].p.read_mem(address, data[31:16]);
word[0].p.read_mem(address, data[15: 0]);
end
endtask
end
...
endcase
endmodule
In a Nutshell
Wrapping things up - this is what we discussed in this article:
- How to use loop generate construct to create multiple instances of module items
- How to use conditional generate construct to change the module's design based on SystemVerilog parameters
- How to use loop and conditional generate constructs with assertions
- How to hierarchically access module items within generate blocks
References
- easics crc tool
- Formal Verification - Erik Seligman, et al.
Questions & Comments
For questions or comments on this article, please use this GitHub Discussions link.
If you found this content useful then please consider supporting this site! 🫶
