A Blueprint for Formal Verification
Introduction
With any verification methodology, the key to success is to have a solid strategy. To that effect, here’s a blueprint for formal verification. This is a template or a verification plan that you can use when performing formal verification. It takes into consideration this might be your first attempt at using formal.
This blueprint divides the formal verification task into 3 steps:
- Gain familiarity with the tool and DUT
Typically, the first step in most verification methodologies is to create a testplan. But with formal, even before writing the testplan, I like to spend some time gaining familiarity with the tool and DUT. This helps me gain some confidence and get into a formal verification mindset. Think of this step as warming-up. - Formal property verification
This is where you will spend bulk of the time. The testplan is created and implemented in this step. - Sign-off
In sign-off you'll determine if you've written enough assertions and perform an important step calledbounded proof analysis.
In this article we use Synopsys' VC Formal tool. But everything that you see here can be done with any other Formal tool as well.
The Blueprint
Formal Verification Strategy
Step 1: Gaining familiarity with the tool
- Create the Formal testbench shell
- Use the tool to automatically detect combinatorial loops, arithmetic overflows and array out-of-range indexing
- Use the tool to automatically detect unreachable code
Step 2: Formal property verification
- Create a Formal testplan
- Code constraints, checkers and witnesses
- Use abstractions to improve proof depth
Step 3: Sign-off
- Perform assertion coverage analysis
- Perform bounded coverage analysis
- Use the tool's automatic fault injection capabilities and see if your testbench detects it
Step 1: Gaining familiarity with the tool
We begin by creating an empty formal testbench shell and gaining some familiarity with the tool by running some sanity checks on the DUT and checking it for unreachable or dead code.
1.1 Create the Formal testbench shell
There are essentially 4 files which make up a formal testbench
design.sv– The DUT codefv_design.sv– The Formal testbenchvc.tcl– This is the run script that instructs the tool what to dofilelist.f– List of files used to successfully compile the design and testbench
Assume your DUT is an arbiter and it’s module port list is as follows
/** arbiter.sv **/
module arbiter (
    input  logic        clk,
    input  logic        rst,
    input  logic        in_vld,
    input  logic [7:0]  in_a,
    input  logic [7:0]  in_b,
    input  logic [1:0]  op_sel,
    input  logic [1:0]  out_sel,
    output logic        rdy,
    output logic [3:0]  out_vld,
    output logic [7:0]  out_a,
    output logic [7:0]  out_b,
    output logic [7:0]  out_c
);
...
endmodule
Recollect from Introduction to Formal Verification, the formal testbench is essentially a verilog module embedded within the DUT. So, create a Formal TB file fv_arbiter.sv as shown below. This file does 2 things:
- It creates a module called
fv_arbiter. Since you'll be starting by writing constraints on the inputs and assertions on the outputs, you'll notice that this module has the same port list as the DUT, with the only difference that theoutputsof the DUT become inputs to the testbench. - Embed the formal testbench into the DUT using the SystemVerilog
bindstatement./** fv_arbiter.sv **/ /* * bind the `fv_arbiter` testbench module to the `arbiter` * design module. * * `bind` essentially tells the compiler to insert * the following statement * `fv_arbiter fv_arb_inst (.*);` * within module arbiter.sv */ bind arbiter fv_arbiter fv_arb_inst (.*); /* * Formal verification testbench */ module fv_arbiter ( input logic clk, input logic rst, input logic in_vld, input logic [7:0] in_a, input logic [7:0] in_b, input logic [1:0] op_sel, input logic [1:0] out_sel, // Note that all outputs become inputs to the FV // testbench so that we can write checkers on them input /*output*/ logic rdy, input /*output*/ logic [3:0] out_vld, input /*output*/ logic [7:0] out_a, input /*output*/ logic [7:0] out_b, input /*output*/ logic [7:0] out_c, input /*output*/ logic [7:0] out_d, ); endmodule
Create a filelist and include all files which are part of this testbench
/** filelist.f **/
// Include dirs
+incdir+../../rtl/
+incdir+../../include/
-y+../../include/
+libext+.v+.sv+.svh+

// Design files
../../rtl/arbiter.sv

// Formal TB
-sverilog
../src/fv_arbiter.sv
1.2 Run Automatic Extracted Properties
Before we proceed, there’s an important thing to understand about formal tools.
They are fairly complex and serve many functions. They have this concept called "Apps". Similar to the apps on your phone. Each App specializes in a specific task and is essentially a specialized set of algorithms to do a specific job. For example, among many apps, VC Formal has these 3 apps which we will use:
Formal Property Verification [FPV]: This app analyzes and proves assertionsFormal Coverage Analyzer [FCA]: App responsible for collecting coverageAutomatically Extracted Properties [AEP]: This app lets you run some sanity checks on the DUT and analyze it for issues such as combinatorial loops, arithmetic overflows and array out-of-range indexing
At this point, we have 3 of the 4 files needed (design.sv, formal_tb.sv and filelist.f) and your Formal TB is just an empty shell. No constraints or checkers have been written. We will next run the AEP app and perform sanity checks on the design.
Create a vc_aep.tcl run script and paste the following snippet within in. The comments included in the code below provide some explanation of what that command does.
/** vc_aep.tcl **/
# Ask VC Formal to come up in AEP app mode
set_app_var fml_mode_on true
set_fml_appmode AEP

# Ask VC Formal to read in the filelist
set design arbiter
read_file -top $design -format sverilog -aep all -sva -vcs {-f filelist.f}

# Since the formal testbench is embedded within the DUT,
# we ask the tool to drive the clock and resets
create_clock clk -period 100
create_reset rst_clk -high

# Ask VC Formal to bring the design out of reset
sim_run -stable
sim_save_reset

# Let AEP do its thing
check_fv -block
report_fv -list > aep_results.txt
Now execute the above script with the command below. This will launch the Verdi GUI and run the VC Formal AEP app.
%> vcf -verdi -f vc_aep.tcl
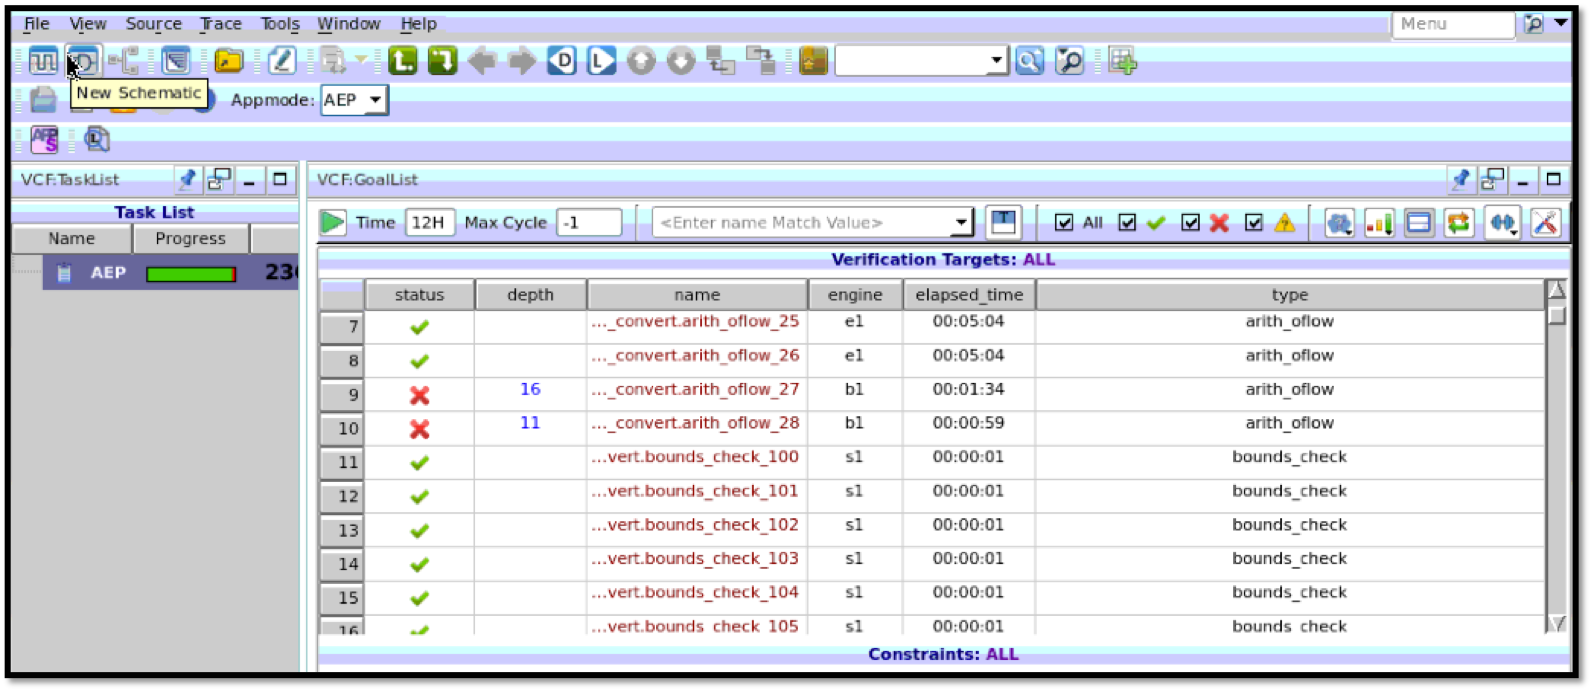
The picture below shows what the dashboard looks like once the tool has done its thing. You can see that it has created an assertion where ever it finds an arithmetic operation in the design. Where ever it sees array style operations, it creates an assertion and checks for bounds.
1.3 Run dead code (unreachability) analysis
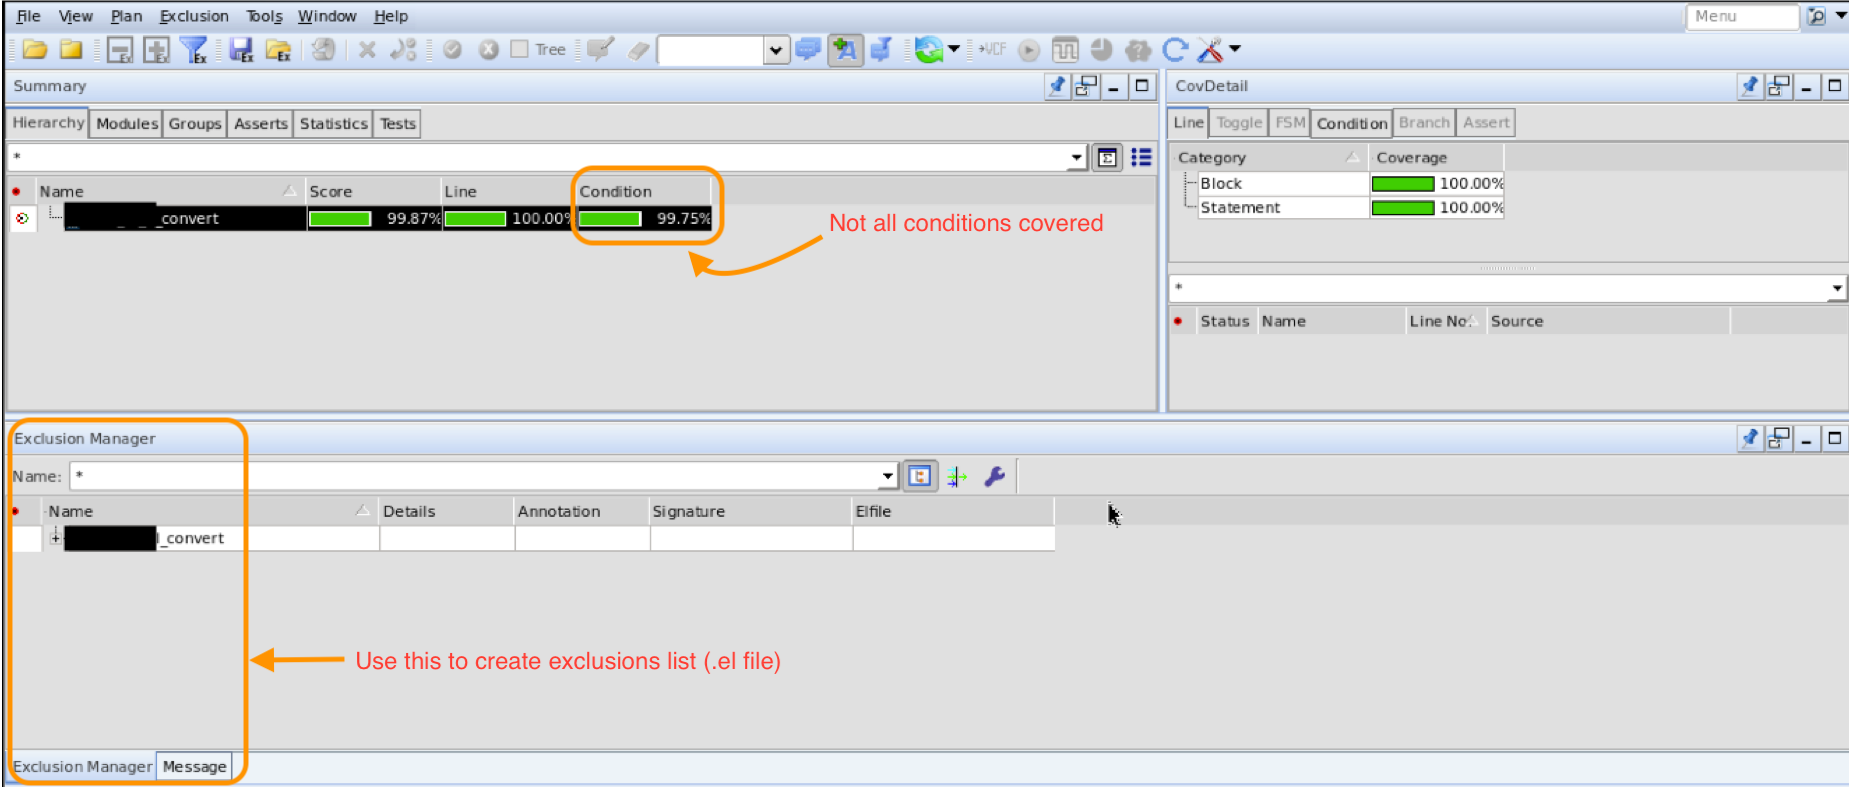
Analyzing the design for dead code is very easy with formal tools. In case of VC Formal you can achieve this with the FCA app. This app's specialty is coverage. We use it to collect line+cond coverage. The reports from this step will allow us to do 2 things:
- Analyze the
line+condreports and find unreachable code - Create a coverage exclusion list early and establish a baseline of what you don't expect to be covered
Running this is very similar to the previous step. Create a vc_cov.tcl and run it using this command.
/** vc_cov.tcl **/
set_app_var fml_mode_on true
set_fml_appmode COV

set design arbiter
read_file -top $design -format sverilog -cov line+cond -sva -vcs {- cm_cond allops -f filelist.f}

create_clock clk -period 100
create_reset rst_clk -high

sim_run -stable
sim_save_reset

// Run command
%> vcf -verdi -f vc_cov.tcl
Running the above tcl script will launch a dashboard as shown in the two pictures below. You can analyze the reports and see if any line of the design is truely unreachable.

Step 2: Formal Property Verification
At this point you have a basic shell for the Formal TB, the DUT has been checked for basic types of errors and you are ready to move on to FPV – Formal Property Verification.
2.1 Create a Formal testplan
Read through the design specification and create a solid testplan. Just like in functional verification, if you have a missing feature in your testplan, you will have a verification hole. Clearly identify
- What’s the expected behavior at the outputs
- What you expect NOT to happen at the outputs
- What is the expected protocol at the input
You should be able to describe each test item clearly, in plain English. Each of these test items will be later converted into an SVA assertion.
Each assumption for the inputs should also be clearly described because these will be converted into constraints.
2.2 Coding constraints, checkers and witnesses
This step is bulk of the verification work. A good place to start is to
- Write a few simple cover properties on the outputs. Running these cover properties through the FPV app will produce waveforms. Looking at these waves give me confidence that the tool and design is basically working according to spec.
- You can also code up a few simple checkers from the testplan. For example, if the design specification says ack should be asserted exactly 2 cycles after a req is made, you would code up an assertion as shown below.
// Checker example
property req_ack_protocol;
    @(posedge clk) disable iff (rst)
    (req |-> ##2 ack);
endproperty
req_ack_protocol_A: assert property (req_ack_protocol);

// Cover or witness example
property out_data_witness;
    @(posedge clk) disable iff (rst)
    (out_vld && out_data == 8’haa);
endproperty
out_data_witness_W: cover property (out_data_witness);
Create and launch vc_fpv.tcl. It is similar to the previous tcl files, but launches VC Formal in FPV AppMode.
%> vcf -verdi -f vc_cov.tcl

/** vc_fpv.tcl **/
set_app_var fml_mode_on true
set_fml_appmode FPV

set design arbiter
read_file -top $design -format sverilog -aep all -sva -vcs {-f filelist.f}

create_clock clk -period 100
create_reset rst_clk -high

sim_run -stable
sim_save_reset
On the Verdi dashboard, you can right-click on the cover property or assertion and run it
Here are a few things to keep in mind as you proceed through your testplan coding up the constraints and checkers
- SVA allows several complex constructs, avoid them. Keep your properties simple.
- Keep your properties sequentially short, i.e., if possible, split long assertions into multiple smaller ones. This will reduce the COI of the checker and make it easier for to tool to solve.
- Use bits of modeling code to keep the property simple.
2.3 Bounded depth and formal abstractions
Formal abstraction techniques are a whole topic in itself. We’ll just be scratching the surface here.
When the tool tries to prove a property one of 3 things happen
Falsified: The assertion is falsified, i.e., for the tool was able to find a set of stimulus for which the design violates the assertion. When this happens the tool produces a waveform dump called a counter example.Full Proof: This is denoted by a green check mark as shown in the figure below. Here the tool guarantees you that this particular property will not fail for any sequence of inputs.Inconclusive Proof: If the design has reasonable complexity, it is very likely that some assertions will not be get fully proven but instead have an inconclusive result with a proof depth. In the figure below, you can see that VC Formal denotes this as a triangle with a question-mark in it. It also shows that the particular property was proven to a depth of 7 clocks. This depth is called the bounded-depth. Here, the tool is telling you that from reset state, upto a depth of 7 clock cycles, this assertion will not fail. But, beyond a depth of 7 all bets are off.

In your Formal Verification effort, you will almost always come across checkers which the tool cannot fully verify. When this happens, you have to figure out if the bounded-depth is sufficient for your design. I typically do this analysis in 2 steps:
Talk to the designer: The designer can give you some valuable input, for example - "In 7 clocks 3 jumbo frames can make it through the design" or "The design has a 16 deep FIFO so a bounded-depth of 7 is insufficient". This will give you an immediate feel of whether the reported bounded-depth is good, not good enough or borderline.Determine baseline bounded depth: Typically, in the line and conditional coverage reports, formal tools will also report the cycle depth at which a condition or line was covered. Figure below shows a report from Synopsys' VC Formal. You can see that there are conditions in the design which are only covered at a depth of 12 clocks. So, I analyze the line+cond coverage reports from Step 1, look for the largest depth I can find and use that as the required baseline bounded-depth.

If you conclude that the bounded-depth is not sufficient, you can leverage several abstraction techniques to increase the proof depth. A few of these techniques are:
-
Reset abstraction– Allows the formal tool to choose a random reset value for some state in the design. This can help with removing possible asymmetry in the design and improve coverage. For example, you can apply reset abstraction to FIFO rd/wr pointers so they can start at any value instead of typical reset value of zero. You would do this by modifying the tcl script as follows.sim_run -stable sim_set_state -apply 'x {fifo.wr_ptr} sim_set_state -apply 'x {fifo.rd_ptr} sim_save_reset # Ensure rd/wr_ptr are random, but the same value after 1st clock # fvassume -clock clk -expr {fifo.rd_ptr == fifo.wr_ptr} -depth 1 -
Symbolic variables– Takes advantage of design symmetry to reduce the state space of the formal testbench as constraints, assertions and modeling code are written only for the symbolic variable. Symbolic variables can take any legal value and are kept stable during a formal run. For example, when verifying control logic that reads/writes to a memory, it is sufficient to verify the behavior for one address as the control logic behaves identically across all addresses. Counter abstraction– Abstract the behavior of large counters by reducing the sequential depth of the design. For example, an 8-bit counter (256-states) can be abstracted into a 3 state FSM comprising of minimum, intermediate and maximum values states, if the intermediate values do not have any special design behavior.Memory/FIFO abstraction– Memories can increase the complexity of the formal verification. If the content of the memory is not important, the memory or FIFO can be removed and constraints can be added on the memory outputs to adhere to expected behavior.Data coloring– If a wide data bus flows through from the input to the output of the formal testbench unaltered, coloring just a few data bits to a known pattern can be a useful technique to check the outputs and reduce or eliminate the need for modeling code.
For now, just know that you have these additional tools which you can use.
Step 3: Sign off
To achieve sign-off you have to determine
- Are there over-constraints in the Formal TB?
- Are enough assertions been written to cover all functionality in the design.
- Are the bounded proof depths sufficient?
- Use fault injection to check for assertion density
3.1: Over-constraint analysis
Having over-constraints in the testbench will leave verification holes. The following figure shows how you can run over-constraint analysis on the testbench. Other Formal tools typically have an equivalent functionality. Analyze the reports from this analysis and fix any un-intended over-constraints.

3.2: Assertion coverage analysis
This is also called COI coverage or Formal Core Coverage. The VC Formal tool can analyze all the assertions and report a list of inputs, outputs and internal registers that are not part of any assertions. Review this list and either waive or write additional assertions.

3.3: Bounded coverage analysis
Since bounded-depth analysis is very important. It is worth revisiting this step and confirming if depths reached are sufficient.
- To determine the minimum required depth, run the tool in the COV mode (line+cond). This shows the proof depth for all covered logic. It is recommended to pick the largest depth unless a case can be made against it.
- Write cover properties based on design knowledge and designer inputs. Run the cover properties, and check that the proof depth reported matches the theoretical calculations.
Write cover properties based on design knowledge and designer inputs. Run the cover properties, and check that the proof depth reported matches the theoretical calculations.
- Look into other abstraction techniques to reduce the sequential depth and/or design complexity
- Simplify or split assertions to reduce the complexity
- Reduce the depth/width of FIFOs/memories in the design if that can be done without compromising the verification
- If using symbolic variables, limit the values taken by the symbolic variable. If this is done, it has to be coupled with some randomization of the symbolic variable for each run, so full coverage is eventually reached.
3.4: Fault injection
VC Formal has another app called FTA (Formal Testbench Analyzer) which injects faults in the RTL to check if the testbench can detect it. If the fault is not detected, it's an indication that sufficient checkers haven't been written.
Conclusion
This article walks you through a step-by-step strategy of how to perform Formal Verification. Some parts of this article, such as the bounded-proof analysis, can seem very intimidating. As you get your feet wet and gain experience, you will notice that by your third formal testbench, just looking at the design specification will give you an idea of what abstraction techniques will be needed.
References
- SystemVerilog LRM IEEE 1800-2012
- Applied Formal Verification - Douglas Perry & Harry Foster
- Formal Verification - Erik Seligman, et. al
- A Practical Guide for SystemVerilog Assertions - Srikanth Vijayaraghavan, et. al
Questions & Comments
For questions or comments on this article, please use the following link.
If you found this content useful then please consider supporting this site! 🫶
